-2.svg "Barista Chaw Su Logo")

Coffee Milk Foaming: Tips for Baristas
The Science of Silky Steamed Milk
The difference between a lackluster latte and a transcendent cappuccino often boils down to one critical element: the milk foam. For the professional barista, coffee enjoyer, or cafe owner, mastering the art of the milk steaming technique is non-negotiable. Forget big, soap-like bubbles; the goal is microfoam—a smooth, velvety texture that integrates perfectly with the espresso, creating a naturally sweeter, balanced beverage.
This isn't just a manual task; it’s an application of dairy chemistry and thermodynamics. In this comprehensive guide, we will break down the precise steps required to consistently create perfect milk foam every time. We’ll move beyond the basics, offering advanced tips and troubleshooting insights to help you eliminate common mistakes and elevate your skill to the level required for stunning latte art. By the end, you’ll know exactly how to make microfoam that delights your customers and optimizes your café's beverage quality.
The Fundamentals: Milk Chemistry and Equipment
Achieving the perfect texture starts long before you turn on the steam wand. It begins with understanding your core ingredient: milk. The quality of your foam is directly tied to the fundamental chemistry of milk and the tools you use to manipulate it.
Understanding the Magic: Fat, Protein, and Sugar (Lactose)
Milk is a complex emulsion of fat, protein, and sugar (lactose) suspended in water. When we introduce heat and air during the milk steaming technique, we are intentionally causing two key reactions:
-
Protein Denaturation: The whey proteins in milk (lactalbumin and lactoglobulin) are coiled up. Heat causes them to denature, or uncoil, allowing them to form a stable lattice structure around the tiny air bubbles you introduce. This stable structure is what defines true microfoam.
-
Lactose Sweetness: The heat also breaks down some of the lactose into simpler sugars, resulting in the perceived sweetness of steamed milk. The proteins encapsulate the fat globules, preventing them from destabilizing the foam and ensuring a wonderfully rich mouthfeel.
Unique Insight: Research suggests the optimal protein-to-fat ratio for the most stable and glossy foam is slightly higher than standard whole milk, which is why many commercial operations invest in high-protein dairy options. The key for baristas is to maximize protein stability while protecting the natural lactose sweetness. We are aiming for milk protein denaturation that leads to maximum stability.
The Role of Dairy vs. Non-Dairy Milks
The specialty coffee world now demands expertise in steaming alternative milks. While dairy relies on whey proteins, non-dairy options use different protein structures:
-
Oat Milk: High-fat oat milks often steam well due to added stabilizers and emulsifiers, providing a creamy texture.
-
Almond Milk: Lower in protein and fat, making it challenging. The foam tends to be delicate and dissipate quickly.
-
Soy Milk: Highly sensitive to heat and acidity (from espresso), often curdling if overheated or held too long.
The most successful technique for steaming non-dairy milk is to keep the temperature on the lower side (closer to 130°F / 54°C) and reduce the initial aeration phase. For example, when you are steaming almond milk, you want minimal stretching to avoid dry, large bubbles.
Essential Tools for a Superior Steaming Technique
The final crucial step before steaming is preparation. You need a dedicated, clean, stainless steel milk pitcher.
Pitcher Selection: Size and Spout Geometry
The size of your pitcher is critical for the perfect milk foam ratio. Use the smallest pitcher that can comfortably hold the amount of milk required, allowing enough room for volume expansion (around 20-30%). A pitcher that is too large forces you to steam a tiny amount of milk, leading to poor circulation. For single drinks, a small milk pitcher size (12oz / 350ml) is often ideal.
The spout geometry, often overlooked by novice baristas, dictates your pour control. A sharp, V-shaped spout provides precision for detailed latte art, whereas a wider, rounded spout is easier for large-volume pours like cappuccinos. The right tool is half the battle.
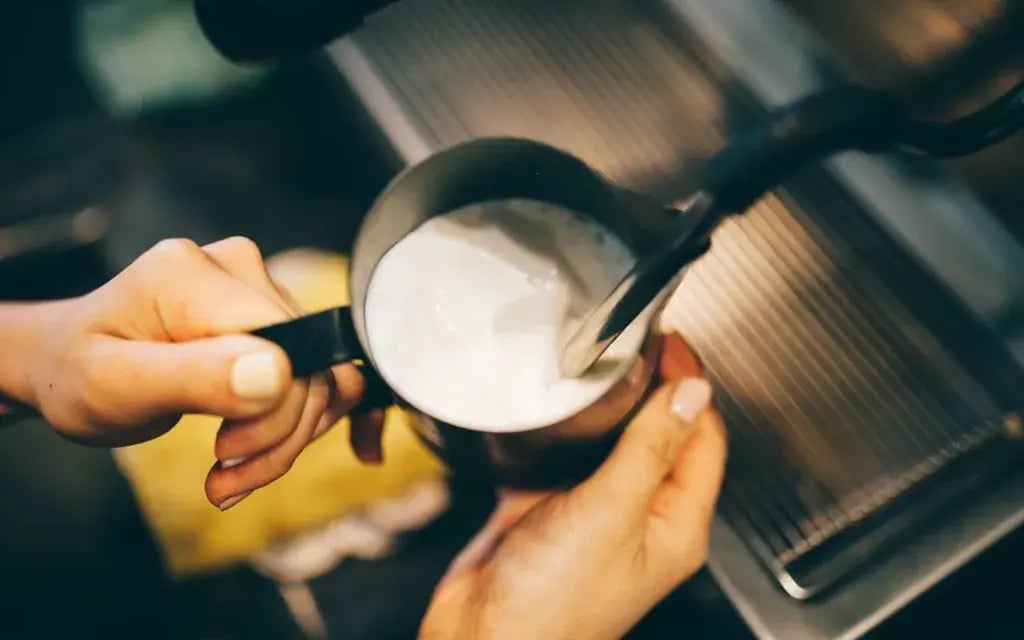
Mastering the Three Phases of Microfoam Creation
To consistently learn how to make microfoam, you must precisely execute the milk steaming technique in three distinct phases. Treat the steam wand tip as a surgical instrument, not a blunt force tool.
Phase 1: Aeration (The "Stretching" Stage)
Aeration is where you introduce the air—the "foam"—into the milk. The goal is to create bubbles so small they are invisible to the naked eye. This is done by placing the steam tip just beneath the surface.
The Critical 2–3 Second Window
This is the most crucial step. Start the steam, and slowly lower the pitcher until you hear a soft, tearing, paper-ripping sound—not a loud shriek. This is the sound of tiny air bubbles being incorporated.
For a cappuccino: You'll stretch the milk for longer (4-6 seconds) to increase volume. For a latte (microfoam): Only stretch for 2-3 seconds, or until the milk volume increases by about 20%. Over-aeration is the primary reason why is my foam too bubbly. Once you’ve achieved your desired volume, lift the pitcher slightly to submerge the steam tip fully.
Phase 2: Texturing (The "Rolling" Stage)
Once the air is in, the next phase is texturing, or "incorporation." This is where the magic of microfoam happens, smoothing out the bubbles and distributing them evenly throughout the milk.
This is achieved by submerging the steam tip roughly halfway down the milk and positioning it slightly off-center. This creates a powerful whirlpool technique for microfoam that continuously draws the incorporated air bubbles down into the cold milk, smoothing them out. The milk should be spinning rapidly, yet silently. If you hear loud sloshing, your angle is wrong.
Hitting the Golden Temperature Window
The texture phase continues until the milk reaches the ideal milk steaming temperature. For dairy, the sweet spot is between 135°F and 150°F (57°C and 65°C).
-
135°F (57°C): Maximum sweetness before lactose begins to break down. Best for small drinks.
-
150°F (65°C): Standard hot temperature for customer safety and comfort.
Going above 160°F (71°C) will scorch the milk, destroying the foam structure and denaturing the proteins so much that they cannot recover, leading to a thin, cooked taste—a phenomenon known as "dead milk." For a barista milk temperature guide, always use your hand sensitivity—the pitcher becomes too hot to hold comfortably around 100°F (38°C); pull the steam wand out shortly after it becomes unbearable.
Phase 3: The Purge and Wipe
Immediate hygiene is essential for safety and machine longevity. As soon as you remove the pitcher:
-
Wipe: Immediately wipe the steam wand with a dedicated, clean, damp cloth.
-
Purge: Open the steam valve fully for half a second to purge any milk that may have been sucked up inside the wand.
This simple act prevents dried milk from clogging the steam tip and dramatically extends the life of your equipment. It is a non-negotiable step in how to clean a steam wand properly after every use.
Troubleshooting and Advanced Techniques for Perfect Results
Consistent perfect milk foam is the hallmark of an exceptional barista. This section covers common pitfalls and advanced strategies to take your milk work from good to great.
Why is My Foam Too Bubbly? Common Pitfalls
The most frequent complaint is large, dry foam—or what is sometimes called "soap foam." This is almost always due to improper aeration:
-
Too Long on the Surface (Over-Stretching): You incorporated too much air, creating a thick layer of foam. Limit aeration to a few seconds.
-
Improper Steam Tip Position: The tip was too far out of the milk, causing aggressive churning and splashing instead of gentle tearing.
-
Milk Temperature Too High: If you start aerating once the milk is already warm, the proteins set too fast, locking in large bubbles. Always start with cold milk.
Advanced Tip: The Cold Start Advantage
While the standard technique starts with chilled milk, experienced baristas know that super-chilling your milk pitcher can give you an extra 2-3 seconds of crucial time in the aeration phase before the milk heats up too quickly. This extended window allows for more precise air incorporation, resulting in even silkier perfect milk foam. For a high-volume café, pre-chilling your pitchers in a freezer is a low-effort, high-impact way to improve consistency. This is especially helpful when perfecting latte art tips for beginners, as it slows down the process.
Integrating the Shot: The Seamless Pour
The final step is integrating the microfoam with the espresso shot.
Practicing the “Seamless Flow” Technique
The goal of the pour is to smoothly blend the velvety milk with the rich crema of the espresso. Hold the cup at an angle, and pour high and steadily into the center. This "diving" pour allows the milk to pass under the crema, mixing the espresso and milk into a single, sweet beverage before you drop the pitcher low for the final design. The best results often depend on using the best milk for latte art, which typically means cold, whole milk due to its ideal fat and protein content.
Post-Shift Cleanup: Extending Machine Life
As a cafe owner, machine maintenance is paramount. Dried milk residue on the steam wand degrades the quality of future drinks and is a breeding ground for bacteria. Use specialized espresso machine detergent (like Cafiza or similar products) once a day to soak and scrub the steam wands completely, ensuring all orifices are clear. Consistent cleaning is an investment in your equipment and your product's taste.
Quick Takeaways
-
Temperature is King: Stop steaming between 135°F and 150°F (57°C and 65°C). Never exceed 160°F.
-
Aeration is Brief: Aim for a 2-3 second "tearing" sound to introduce air, avoiding a loud shriek or sloshing.
-
Whip it into a Whirlpool: Create a silent, powerful vortex during the texturing phase to smooth out bubbles into true microfoam.
-
Chill for Control: Use pre-chilled pitchers to give yourself more time for precise aeration.
-
Prioritize Hygiene: Immediately purge and wipe the steam wand after every single use.
-
Mind the Milks: Steam non-dairy milks at a lower temperature and with less aeration than whole dairy milk.
-
Perfect the Pour: Pour high to blend and low to create your art.
Conclusion: The Pursuit of Barista Excellence
For the coffee enjoyer, the resulting beverage is a moment of delight; for the professional barista and cafe owner, the creation of perfect milk foam is a direct reflection of skill and quality control. Mastery of the milk steaming technique is an ongoing pursuit that demands consistency, attention to detail, and a deep respect for the science of milk.
We have explored the delicate balance of milk protein denaturation, the critical timing of aeration, and the precise temperature needed to unlock the inherent sweetness of lactose. Whether you are battling high-volume orders or experimenting with alternative options like non-dairy milks, these tips provide the framework for professional-level execution.
Don't settle for mediocre, dishwater foam. Invest the time in perfecting your whirlpool, learning your machine’s steam pressure, and hitting that golden temperature window consistently. The ability to flawlessly execute how to make microfoam transforms a simple beverage into a crafted experience, elevating your café’s reputation and securing customer loyalty. Your next perfect drink is just a few degrees and a seamless pour away. Start implementing these techniques today, and watch your customers—and your latte art—flourish.
Great latte art is impossible without great microfoam. If you’re ready to stop practicing alone and start learning from a pro, Barista Chaw Su is here if you need help about foaming. Discover how our [Services] can fast-track your skills, or read about Chaw Su’s journey toward coffee excellence on our [About Us] page.
While your milk is steaming, your espresso should be extracting. If you're seeing thin crema or uneven flow, it might be time to revisit your preparation. Learn how to fix channeling in our guide to [Professional Tamping Techniques].
The way your milk foam tastes is heavily influenced by the beans you choose. Arabica offers sweetness and acidity, while Robusta provides a thick crema that holds latte art beautifully. Discover which bean suits your palate in our breakdown of [Arabica vs. Robusta].
Frequently Asked Questions (FAQs)
Q: What is the difference between "foam" and microfoam?
A: Standard foam has large, visible bubbles and a dry texture, often sitting on top of the liquid. Microfoam is velvety, glossy, and fully integrated with the milk, consisting of tiny, nearly invisible air bubbles. It’s what you need for genuine latte art and a superior milk steaming technique.
Q: What happens if I overheat the milk past 160°F?
A: Overheating the milk (past 160°F / 71°C) causes a process called milk protein denaturation, where the proteins permanently break down. This results in a thin, watery texture, a cooked flavor, and an inability to maintain foam stability, often leading to what baristas call "dead milk."
Q: Why is my steam wand spitting water at the start?
A: Water accumulation inside the steam wand (condensation) is normal. You must always fully purge the steam wand before you put the tip into the milk. This ensures you introduce only clean, dry steam, which is essential for achieving perfect milk foam.
Q: Is whole milk always the best milk for latte art?
A: While whole milk provides the most stable and glossy canvas due to its higher fat content, modern barista-specific oat and soy milks are excellent alternatives. The ideal milk for latte art is primarily determined by its protein and fat content—aim for higher protein for structure and higher fat for a rich mouthfeel.
Q: How can a café owner troubleshoot inconsistent foam quality across multiple baristas?
A: Inconsistent foam usually stems from a lack of standardization in the barista milk temperature guide and aeration time. Implement a digital thermometer check, standardize pitcher sizes for specific drinks, and enforce the "Critical 2-3 Second Window" rule for aeration across all staff to ensure consistent quality and help every team member learn how to make microfoam.
References
-
Hoffmann, James. (2018). The World Atlas of Coffee: From Beans to Brewing. Mitchell Beazley. (Focus on milk science and temperature.)
-
Specialty Coffee Association (SCA). (Ongoing Certification Programs). Official Barista Skills Module. (Standardized techniques and best practices for commercial application.)
-
Dairy Science and Technology Journal. (2022). Influence of Heat Treatment on Milk Protein Functionality and Foam Stability. (A scientific perspective on protein denaturation and foaming ability.)
-
Lingle, Scott. (2012). The Coffee Brewing Handbook. Specialty Coffee Association of America. (Technical details on espresso machine operation and maintenance.)
-5.svg "BA (600 x 450 px)-5")
Leave your thought here